
この記事は、リニューアル前のKARTE Blocksに関する内容です。 現在ご利用中のUIが新しくなっている場合は、最新のサポート記事をご覧ください。
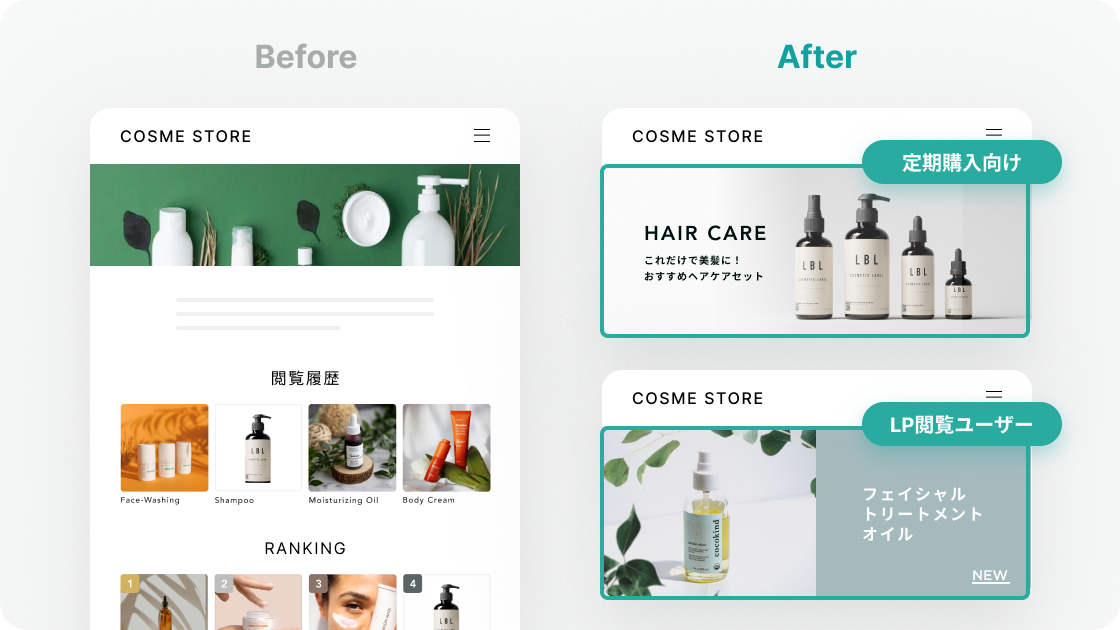
バナーを新設したり、ユーザーに合わせて内容を変更(パーソナライズ)したりすることでコンバージョンを促進するための施策の設定方法をご案内します。
- 作成難易度:★★☆
- 必要なイベント:閲覧(view)
- ※購入(buy)、ユーザー属性情報(identify)を利用した高度なパーソナライズをする場合、カスタムタグ の設置が必要となります。
- ※購入(buy)、ユーザー属性情報(identify)を利用した高度なパーソナライズをする場合、カスタムタグ の設置が必要となります。

施策の概要
- 目的:バナーを新設したり、ユーザーに合わせて内容を変更(パーソナライズ)したりすることでコンバージョンを促進する
- ゴール:バナーのクリック率・経由コンバージョン率
- 主なターゲット:特定のページを閲覧しているユーザー・特定の商品を購入しているユーザー・全員
- 配信するページ:サービスサイト・マイページ・ランディングページ(LP)
設定方法
手順1:セグメントを作成する
- サイト閲覧のデータを利用する場合は、「Blocksのセグメント」を作成してください。
- 購入データやユーザーデータを利用する場合は、「Insightのセグメント」作成してください。
 補足
補足Insightのセグメント機能では、主にKARTEタグを通じて計測したイベントデータを参照しセグメント判定します。 view(閲覧)イベントなど自動で計測するイベント以外でセグメントを作成したい場合、カスタムタグを追加で設置して必要なイベントデータを計測してください。
Blocksのセグメント
今回はBlocksのセグメントの作成方法を説明します。
左メニューバーの「すベてのメニュー > Blocks > セグメント」 より、「Blocksのセグメント」 を作成してください。
- 来訪回数によって分ける
- 特定のページの閲覧によって分ける
来訪回数によって分ける
初回来訪
「初回来訪」というプリセットセグメントが予め用意されているので、こちらを活用してください。

関連するセグメントと設定例
| セグメント名 | 説明 | 条件 |
|---|---|---|
| 2回目の来訪 | すべての期間での2回目来訪 | すべての期間 > タイムウィンドウ変更 > 来訪回数(セッション発生回数) > 2に等しい |
| 3回目の来訪 | すべての期間での3回目来訪 | すべての期間 > タイムウィンドウ変更 > 来訪回数(セッション発生回数) > 3に等しい |
| 4回目の来訪 | すべての期間での4回目来訪 | すべての期間 > タイムウィンドウ変更 > 来訪回数(セッション発生回数) > 4に等しい |
| 5回目の来訪 | すべての期間での5回目来訪 | すべての期間 > タイムウィンドウ変更 > 来訪回数(セッション発生回数) > 5に等しい |
| 6回以上 - 10回未満の来訪 | すべての期間での6回以上、10回未満の来訪 | すべての期間 > タイムウィンドウ変更 > 来訪回数(セッション発生回数) > 6以上、10未満 |
| 10回以上来訪 | すべての期間での10回目以上の来訪 | すべての期間 > タイムウィンドウ変更 > 来訪回数(セッション発生回数) > 10以上 |
特定のページの閲覧によって分ける
特定ページの閲覧行動によってセグメントを設定することで、ユーザーの属性情報を取得せずともパーソナライズが可能になります。
条件設定例
- 会員ユーザーしかアクセスしかできないページを閲覧した→会員ユーザー
- 購入完了ページを閲覧した→購入経験ありユーザー
- 特定のカテゴリページを何回も見た→特定のジャンルに興味があるユーザー
会員ユーザーしかアクセスしかできないページを閲覧した
- すべての期間 > 閲覧 > 閲覧ページのパス > 一致回数
- 「(実際の会員限定ページのパスの値が入ります)」が1以上

※会員限定ページの閲覧=会員ユーザーと見なせる場合の設定になりますので、予めご認識ください。
購入完了ページを閲覧した
- すべての期間 > 閲覧 > 閲覧ページのパス > 一致回数
- 「(実際の購入完了ページのパスの値が入ります)」「1」「以上」

※購入完了ページの閲覧=購入完了していると見なせる場合の設定になりますので、予めご認識ください。
特定のカテゴリページを10回以上閲覧した
- すべての期間 > 閲覧 > 閲覧ページのパス > 一致回数
- 「(実際の特定カテゴリページのパスの値が入ります)」が10以上

関連するセグメントと設定例
| セグメント名 | 説明 | 条件 |
|---|---|---|
| 購入経験なし | すべての期間で購入経験がない | すべての期間 > 閲覧 > 閲覧ページのパス > 一致回数 > /purchase/completeが0に等しい |
| 会員登録済み | すべての期間で会員登録済み | すべての期間 > 閲覧 > 閲覧ページのパス > 一致回数 > /signup/completeが1以上 |
| 会員登録なし | すべての期間で会員登録していない | すべての期間 > 閲覧 > 閲覧ページのパス > 一致回数 > /signup/completeが0に等しい |
| 今日購入した | 今日購入済み | 今日 > 閲覧 > 閲覧ページのパス > 一致回数 > /purchase/completeが1以上 |
| 1週間購入なし | 直近7日間で購入していない | 直近7日間 > 閲覧 > 閲覧ページのパス > 一致回数 > /purchase/completeが0に等しい |
| 特集ページを1回見た | すべての期間で特集ページを1回閲覧している | すべての期間 > 閲覧 > 閲覧ページのパス > 一致回数 > /campaignが1に等しい |
| お問い合わせページを3回以上見た | すべての期間でお問い合わせページを3回以上閲覧している | すべての期間 > 閲覧 > 閲覧ページのパス > 一致回数 > /inquiryが3以上 |
※ページのパスをそれぞれ下記と仮定
- 購入完了ページのパス:
/purchase/complete - 会員登録完了ページのパス:
/signup/complete - お問い合わせページのパス:
/inquiry - 特集ページのパス:
/campaign
そのほかのBlocksのセグメント作成方法についてはこちらをご確認ください。
手順2:ゴールを作成する
左メニューバーの「すベてのメニュー > Blocks > ゴール」を選択してください。
今回は、view(閲覧)イベントを元に設定します。
KARTEタグ(計測タグ)を設置することでviewイベントは自動計測されるため、追加でイベントの計測設定なくすぐに利用することが可能です。

業界別ゴール例
| 業界 | 中間ゴール | 最終ゴール |
|---|---|---|
| EC・アパレルサイト | 商品詳細ページ閲覧、カート投入 | 購入 |
| 人材サイト | 気になるリスト登録、履歴書登録 | 求人案件応募 |
| 不動産サイト | 再来訪、資料請求 | 来場予約、物件申込 |
| 金融・保険サイト | 見積シミュレーション、資料請求 | 問い合わせ、商品申込 |
そのほかのゴール作成方法についてはこちらをご確認ください。
手順3:ページを登録する
ブロックの変更・配信、ブロックの効果計測を行う最初のステップとして、対象となる「ページ」を登録します。
「ページ一覧」画面内の登録導線から、任意のURLを入力してください。

詳細はこちらをご確認ください。
手順4:配信条件を設定する
配信条件を設定します。
設定したい対象ページをクリックし、「配信条件を作成」ボタンから新規作成します。
目的に応じて各種設定を行い、保存します。
すぐにサイトに配信を行わずにプレビューなどで確認したい場合、ステータスを「停止」に変更して保存しましょう。

配信条件の設定例
| ケース | 配信条件の設定 |
|---|---|
| ユーザーに表示する前に実サイトで確認したい | 対象ユーザー に、「テストセグメント」に合致する、と指定 |
| 特定日時で自動的に配信したい | 配信スケジュール を指定 |
| ABテストしたい | 複数パターン・配信率 を指定 |
| 特定ユーザーにだけ配信したい | 対象ユーザー に、該当セグメントを指定 |
※推奨の設定条件を記載しておりますが、施策の目的やサイトの仕様によって条件はカスタマイズしてください。
手順5:ページ編集
作成した配信条件にカーソルを合わせ、「ページを編集する」をクリックし、ページエディタ画面に遷移します。
すでにあるバナーを編集する
変更したいバナーを選択し、編集。
リンクを変更するにはaタグを選択する必要がございます。 右上のレイヤーパネルからを含めるように選択してください。

新しくバナーを設置する
バナーを差し込みたいブロックの前後のブロックを選択し、「ストアから」を選択してください。
ブロックストアにイメージリンクのテンプレートがございます。
配信前のチェック
必ずテスト配信を実施し、問題がないか確認しましょう。詳細はこちらをご確認ください。
効果集計
ブロックリストより、変更したコンテンツの表示数やクリック数を確認することができます。
表示される指標の定義は以下の通りです。
オリジナルブロックに対して、ブロックを前後に追加している場合、追加しているブロックのみ指標を表示します。
オリジナルブロック自体の数値は含みませんのでご注意ください。
| 項目 | 説明 |
|---|---|
| 表示ユーザー | 日別の「ブロックが表示されたユーザーの数」の期間合計 |
| クリックユーザー | 日別の「ブロックをクリックしたユーザーの数」の期間合計 |
| クリック率 | クリックユーザー / 表示ユーザー |
| ゴールユーザー(表示経由) | 日別の「ブロックの表示後にゴールに到達したユーザーの数」の期間合計 |
| ゴール率(表示経由) | ゴールユーザー(表示経由) / 表示ユーザー |
| ゴールユーザー(クリック経由) | 日別の「ブロックのクリック後にゴールに到達したユーザー」の期間合計 |
| ゴール率(クリック経由) | ゴールユーザー(クリック経由) / クリックユーザー |
※プレビューはブロックの「表示」が計測されるユーザーに含まれません。
ブロックのクリックが計測される条件
- 次のHTML要素のいずれかをクリックしたときにトラッキングされます。
<a><button><input type="button"><input type="submit"><input type="image">
- 1つのブロック内に複数の計測対象要素がある場合、クリック数は合算されます。
- ブロック内の要素毎にクリック数を確認することはできないため、ブロックを分けて登録いただくか、それぞれにクリックイベントを分けて手動設定してください。
ブロックの表示が計測される条件
- 「ブラウザのスクリーン上に対象のブロックが50%以上表示されたタイミング」でトラッキングされます
- 実際にブラウザ上に表示されなかった場合はカウントされません。以下のようなケースにはご注意ください。
- 「ブロックを非表示」 にしている場合、ブロックの表示ユーザーは表示されません。
- ブロックの高さが0の場合には、画面内に表示されたものとしてカウントされます。
- 極端に広い要素をブロックとして登録した場合(ex.ページのコンテンツ全体)、表示数はカウントされません。
- 実際にブラウザ上に表示されなかった場合はカウントされません。以下のようなケースにはご注意ください。
- 上記条件に合致しない場合でも、ブロックの「クリック」が計測されると、ブロックの「表示」もされたものとしてみなし、イベントが発生します。
- ブロックの変更が完了する直前にトラッキングされます。
- 何か不具合などでブロックの変更がされなかった場合でも、表示数が加算される場合があります。
ブロックリストの詳細についてはこちらをご確認ください。