
接客サービス設定画面では、接客サービス一覧画面の表示設定や接客ラベルの管理を行うことができます。
グローバルメニュー > すべてのメニュー > アクション > 接客サービス設定をクリックします
一覧表示設定
接客サービス一覧画面に表示する項目を変更することができます。

設定方法
- 接客サービス設定画面の基本設定から「一覧表示設定」をクリック
- 右上にある「編集」ボタンをクリック
- 表示/非表示にしたい項目をクリック
- 右上にある「保存」ボタンをクリック
- 表示設定が保存され、選択した項目が接客サービス一覧画面へ表示されます
接客ラベル管理
接客サービスのラベルの作成、編集、削除が行えます。
Unicode順(「記号」→「数字」→「アルファベット」→「ひらがな」→「カタカナ」→「特殊文字」→「漢字」)で表示しています。

接客ラベルの項目
接客ラベル名
接客サービス一覧上に表示される名称です。
重複した名称のラベルを作成することはできません。
説明
ラベルに対する説明です。
管理用にラベルの目的やユースケースなどを入れておくと便利です。
ラベルカラー
表示されるラベルの色です。
ラベルの種類分けにご活用ください。
ラベルの表示箇所
接客サービス一覧の各接客サービス名の下に表示されるのが接客ラベルです。
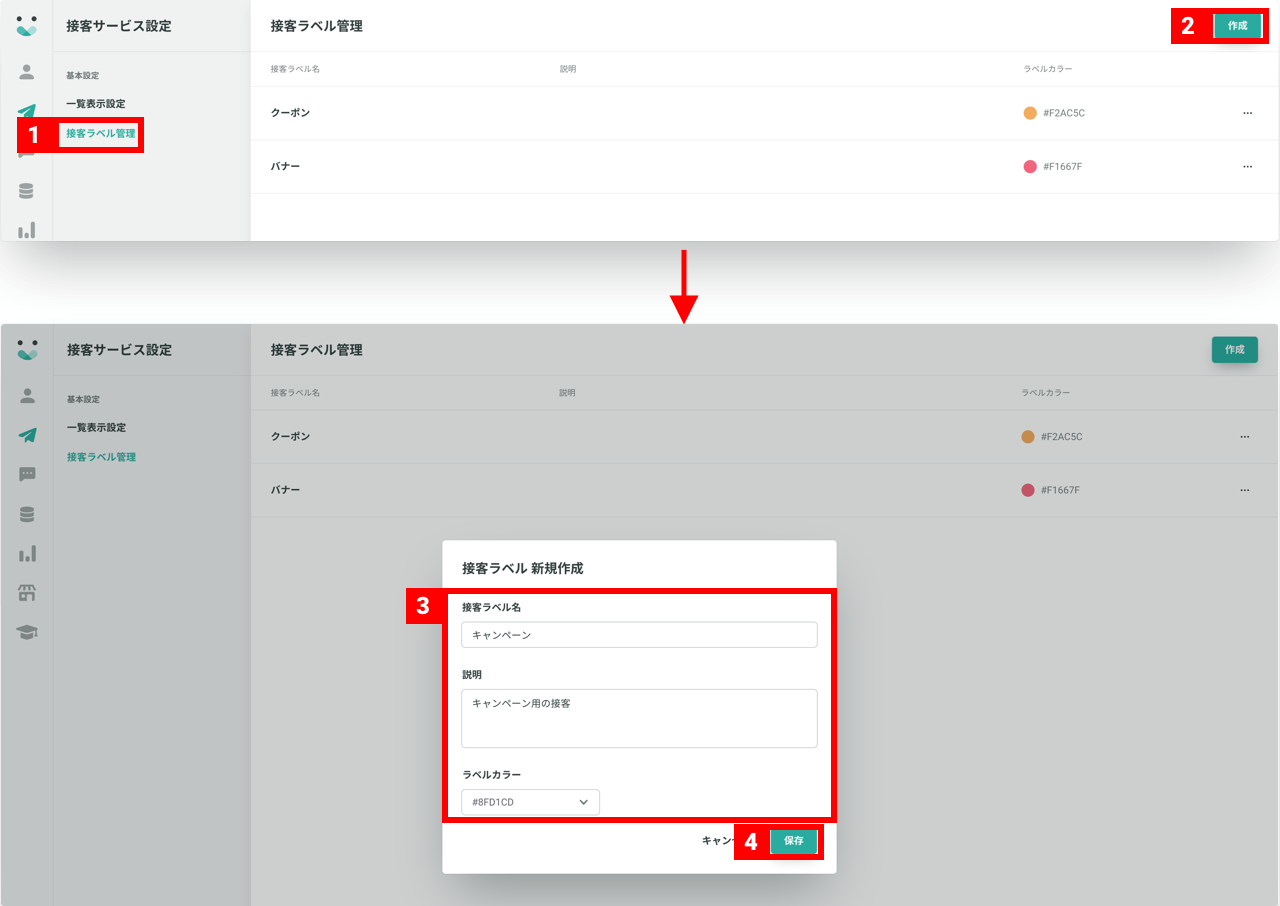
接客ラベルの作成
- 接客サービス設定画面の基本設定から「接客ラベル管理」をクリック
- 右上にある「作成」ボタンをクリック
- 接客ラベル新規作成モーダルが表示されるので、接客ラベル名、説明を記入し、ラベルカラーを選択
- 保存をクリック
- 接客ラベルが作成されます
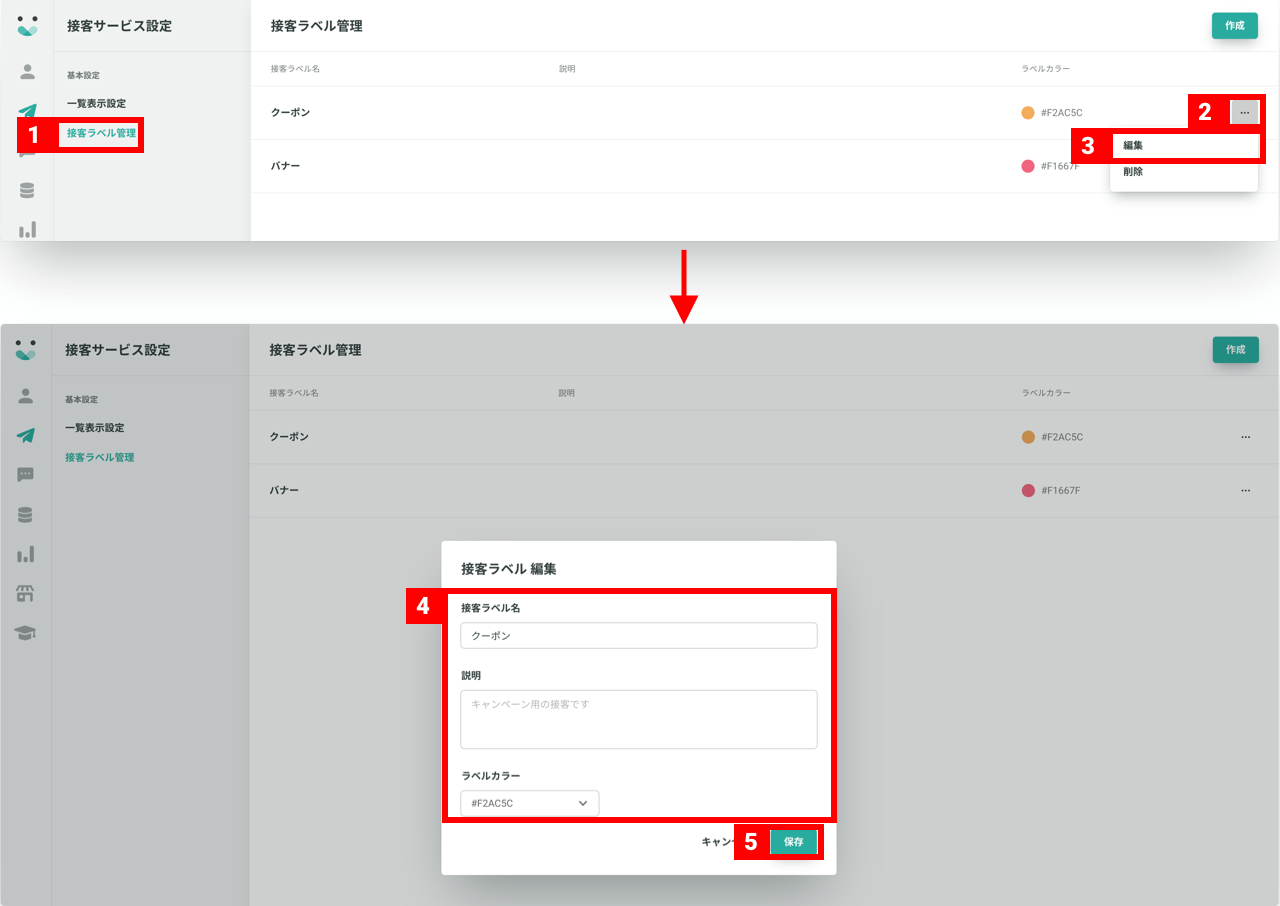
接客ラベルの編集
- 接客サービス設定画面の基本設定から「接客ラベル管理」をクリック
- 編集したい接客ラベルの右横にある「…」ボタンをクリック
- 編集を選択
- 接客ラベル編集モーダルが表示されるので、編集したい箇所を変更
- 右下の「保存」ボタンをクリック
- 保存が完了し反映されます※
※既に接客サービスへ付与されている接客ラベルを編集した場合、付与されたまま編集箇所のみが変更されます。
接客ラベルの削除
- 接客サービス設定画面の基本設定から「接客ラベル管理」をクリック
- 削除したい接客ラベルの右横にある「…」ボタンをクリック
- 削除を選択
- 削除の確認モーダルが表示されるので、内容を確認※1
- 問題がなければ、右下の「削除する」ボタンをクリック
- 削除が完了し反映されます※2
※1
削除した接客ラベルは復旧できません。
よく内容をご確認のうえ、操作の実行をしてください。
※2
既に接客サービスへ付与されている接客ラベルを削除した場合、付与されていたラベルも削除されます。
ご留意ください。
接客ラベルの付与
2通りの手順で作成した接客ラベルの付与ができます。
以下のリンクをご確認ください。
接客サービス一覧で接客ラベルを付与する
接客サービス作成フローで接客ラベルを付与する
保存した配信トリガー
接客サービスで作成する配信トリガーを保存し、設定の手間を省くことができます。
効果測定
効果測定画面で表示する指標のデフォルト設定を決めることができます。
指標のカスタマイズ
接客詳細画面で「平均来訪単価」「平均購入単価」を表示するかどうか、設定できます。
購入イベントがなく表示不要な場合は、このチェックボックスをOFFにすると、全接客サービスの接客詳細画面でこの指標が非表示になります。
※接客サービスの指標のカスタマイズでも表示/非表示が可能です。全体の設定より、個別の設定内容が優先して反映されます。
集計期間
接客サービスの画面で表示する集計期間の、デフォルト値を設定できます。
「直近30日」または「当月」を指定でき、この設定は接客サービス一覧画面と、接客サービス詳細画面の集計期間を選択できる各タブに反映されます。
ゴール
接客サービス作成時に設定するゴールの、デフォルト値を設定できます。
ゴールには、ゴール機能のゴールのみ指定できます。
休日設定
祝日や会社の休日を設定し、接客配信のスケジュール対象・対象外にすることができます。
休日設定の追加方法
手動で1件ずつカレンダーから追加する方法と、日本の祝日を一括でインポートする方法があります。インポート時のカレンダー情報の出典元はGoogleCalendarAPIのため、運用に応じて手動で編集してください。また、自動的に再インポートはされないため必要に応じて定期的なインポートをしてください。
(日本の祝日をインポートする場合)
「休日設定」において、日本の祝日をインポートする際の注意事項
日本の祝日をインポートする際は、手動で行う必要があり、インポートするタイミングにて反映できる祝日には限りがあります。休日として設定が必要な祝日に漏れがないか、など適宜ご確認をお願いいたします。
また、カレンダー情報の出典元(Google Calendar API)の関係上、意図しない日時が祝日として設定される可能性もございます。インポート後、管理画面上での設定された日程の確認をお願いします。
接客サービスでの設定
休日設定を完了したら、接客サービス作成フローで、「スケジュール>休日設定」から設定してください。